documentation
the digiwidgets guide
How to install Digiwidgets Plugin
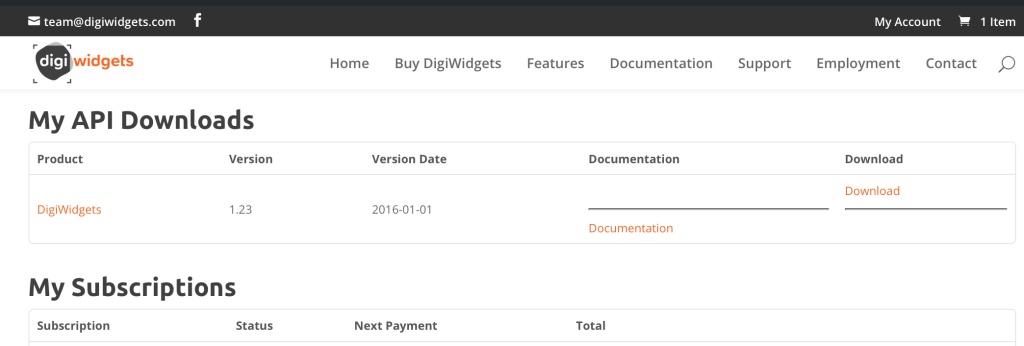
1. After purchasing Digiwidgets plugin at digiwidgets.com, click ‘My Account’ link located at the top right of the website.
2. Scroll down to ‘My API Downloads’ and click the download link in the far right column. Save the zip file on your computer.

3. Log in to your hosted WordPress website dashboard.
4. Select ‘Plugins’ from the left vertical menu.
5. Click ‘Add New’ button at the top of the page.
6. Click ‘Upload Plugin’ button at the top of the page.
7. Click ‘Browse’ button and select the zip file you just saved from the Digiwidgets website. (Must be zipped – do not unzip!)
8. Click ‘Install Now’ button.
9. Once installed, click ‘Activate Plugin’ link.
10. You’ll see a warning about the license key not being active. Click the link provided. Go back to the ‘My Account’ tab on DigiWidgets.com and find ‘My API Keys’. Copy and paste the key into your website in the space provided. You’ll also need to add the email address that you used to purchase the plugin. Click Save Changes button.
11. Digiwidgets will now show up in your left vertical menu.
How to add a new project
1. After installing the DigiWidgets plugin, click on ‘DigiWidgets’ from the left menu in your WordPress dashboard.
2. This is where your Projects will be saved and listed. Click ‘Add New’ button to create a new image-editing project.
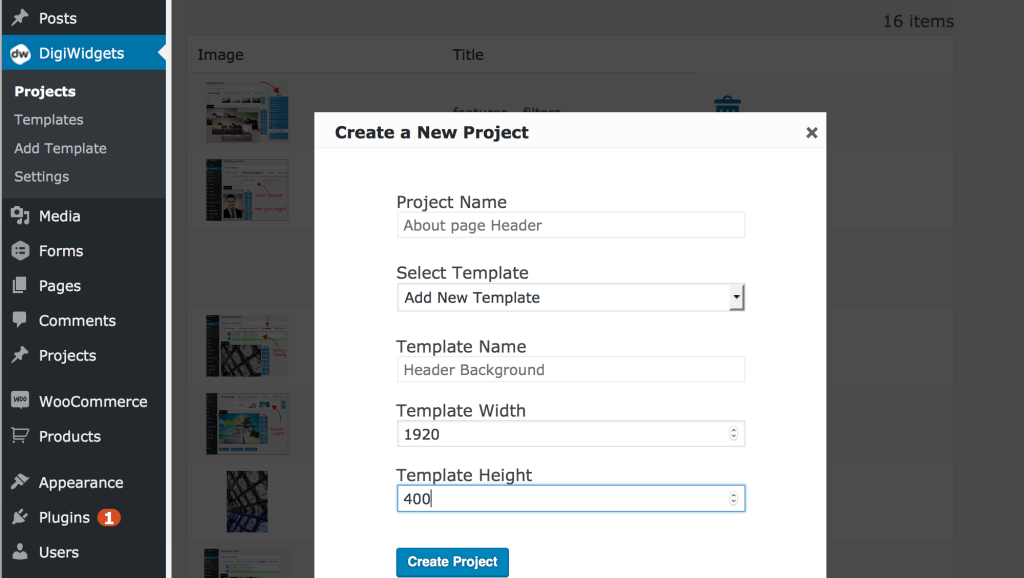
3. You will be prompted to enter a Project Name (ex. Carl’s bio pic, About page header, Content Slider 3 background…)
4. You must also select a template. DigiWidgets WordPress Image Widget offers 4 default templates: Small Vertical, Small Horizontal, Large Vertical and Large Horizontal. You may select one of the default templates, OR create your own custom template of a specific width and height by selecting ‘Add New Template’ from the dropdown. (This feature is intended for designers/developers to utilize and setup templates for their clients).

5. Click ‘Create Project’
6. You will immediately be prompted to add an image to the template. Select one from your existing Media Library or upload a new image and it will be fit into your template.
7. Your project is now created and ready for editing.
How to add a new template
DigiWidgets Image-Editing Tools
1. When selecting an image you will see two displays pop up on top of the canvas. These displays are a red ‘x’ (remove button), and a grid with actions that can transform your image (enlarge, shrink, rotate).
2. Hovering over one action will display a description of what that action does.
![]() will enlarge your image by 5%
will enlarge your image by 5%
![]() will shrink your image by 5%
will shrink your image by 5%
![]() will bring the image forward one layer
will bring the image forward one layer
![]() will send the image back one layer
will send the image back one layer
![]() will bring the image all the way to the front of other images
will bring the image all the way to the front of other images
![]() will send the image all the way to the back of other images
will send the image all the way to the back of other images
![]() will center the image on the canvas (vertically and horizontally)
will center the image on the canvas (vertically and horizontally)
![]() will rotate the image 90 degrees from its current angle
will rotate the image 90 degrees from its current angle
![]() will flip the image vertically
will flip the image vertically
![]() will flip the image horizontally
will flip the image horizontally
![]() will open a window of several filter options to apply to the image
will open a window of several filter options to apply to the image
![]() will allow you to crop the selected image
will allow you to crop the selected image
![]() will allow you to add text to the project
will allow you to add text to the project
![]() will allow you to add a border to the image and/or entire project
will allow you to add a border to the image and/or entire project
Using the 'Add Images' tab
1. One of the great things about DigiWidgets WordPress Image Widget is that you can have multiple images within a single project (which then outputs to a single image you can use on your website). ‘Layers,’ if you will.
2. To add more images to a project, select the ‘Add Images’ tab from the top of a DigiWidgets project.
3. A gallery strip will appear above your project.
4. Click on the big ‘+’ sign to add a new image. As images/layers are added to your project, they will also show up in the gallery above.
5. Use this gallery as a tool to delete images, center images, or change the layering order of the images.
6. To delete an image from the project, select it on the gallery strip and click the trash icon to the right.
7. To center an image, select it on the gallery strip and click the centering icon to the right.
8. To change the layering order of the images, simply drag and drop them in the order you want them – the far left image will be on the very top and the far right on the very bottom.
9. If you add text to your project it will show up as a layer in the gallery strip as well and the icons and layer ordering apply to text layers in the same way.
Using the 'Canvas Management' tab
Using the 'History' tab
The History tab lists every change ever made to a project complete with time stamp. To go back to a previous state, simply scroll through the history and click where you want to start from.
There are also undo and redo icons to the left of the History scroller (however, ctrl-z and ctrl-shift-z work from any DigiWidgets tab).
Using the 'Feedback' tab
The feedback tab takes you to a button that simply sends you to the support form on our website.
DigiWidgets Hotkeys
Useful Hotkeys for the wordpress image widget
Ctrl + Z Undo the last action, if one is available
Ctrl + Shift + Z Redo the last action, if one is available
Ctrl + C Copy the currently selected image (not intended for groups of images). If no image is selected, it will clear the selection
Ctrl + V Paste the image currently copied. Every paste will move the image down and right 10 pixels.
Shift Press shift and click and drag an image to make sure that the image moves only horizontally or vertically (n.b. there is some wiggle room before the editor railroads your click and drag; this is normal)
Alt + Shift Click this while resizing an image to allow the dimensions to be changed without preserving their ratio.
Arrow keys While an image, or group of images is selected, they may be moved around (1 pixel at a time) using the arrow keys.
Del Remove the currently selected image or images
Adding Facebook and Twitter image templates
As a special add-on, DigiWidgets provides templates for Facebook cover and profile images and Twitter header and profile images. These templates are the perfect size to create custom images for your social media sites. To use these templates, follow these instructions:
1. From your WordPress dashboard, select ‘DigiWidgets’ from the left menu.
2. Select ‘Settings’ from the DigiWidgets menu.
3. Check the boxes for Facebook and/or Twitter templates.
4. Create a new project using one of the Facebook or Twitter templates.
5. When done creating and saving project, click ‘Preview Project’ button. This will show you a preview of the full-size image.
6. Right-click the image and select ‘Save Image As…’ and save it to your computer.
7. Login to your Facebook or Twitter accounts and upload your profile/header/cover images that you saved from DigiWidgets.
level up your wordpress game
If you’ve ever wished you had a Photo editor inside your WordPress dashboard, you’ve met your match. DigiWidgets can make your life much easier! Whether you’re looking to hack your workflow or make the client handoff an easier process, the plugin is for you. Click the button below to snag up your copy of DigiWidgets now.
